Naked Enchiladas! Ole!

Last time I posted, I shared with you that we began a new journey or rather restarted an old journey – healthy eating! So far things have been great, I feel great and making smarted food choices is becoming easier. It is still so hard to not want to eat junk food, but having a treat day once a week really helps! Tonight we are having a delicious dessert, that’ll be coming soon to a post near you!!

But first, on to the naked enchiladas! It is becoming more difficult each week to come up with inventive ways to eat chicken, steak and fish. And, to balance it with my love of Mexican cuisine! I decided I wanted to make a spin on my favorite dish – enchiladas! If you think about it, they aren’t half bad for you if take away the tortilla and the delicious, ooey-gooey cheese. :sigh: So I reinvented them without those not-so-good-for you ingredients. The result? Pretty darn delish and totally satisfying!

Image

Naked Enchiladas

Ingredients:

  • 2 T EVOO
  • 2 lbs chicken {we used thigh fillets – boneless and skinless}
  • Salt and pepper
  • 3 large cloves of garlic, minced
  • 1/2 large onion, roughly chopped
  • 1/2 red pepper, roughly chopped
  • 4 stalks of celery, diced
  • 1 can diced tomatoes, zesty or Mexican seasoned
  • 1 small can enchilada sauce
  • 1 can of water
  • 1 T Chili powder
  • 1 t Cumin
  • 1 t Garlic powder
  • Brown rice, for serving
  • Black beans, for serving

Directions

  1. Heat EVOO in a large dutch oven over medium heat. Mean while, season chicken with salt and pepper.
  2. Saute garlic in oil for 1 minute. Add chicken and brown on both sides for 2 minutes.
  3. Add vegetables {onion, pepper, celery and tomatoes}. Pour enchilada sauce and water {I pre-mixed the water and sauce before pouring in} over the top of the chicken and vegetables. Season with chili powder, cumin and garlic powder.
  4. Simmer over medium heat with the lid on for approximately 25-30 minutes. Check to see if the chicken beginning to fall apart, and then pull the chicken out and shred. Once shredded, add back to the pot and continue to simmer for at least another 20 minutes. The longer you simmer, the more flavor the chicken picks up!

Image

Serve over a bed of brown rice and black beans. Delish!

I hope everyone has a great weekend! If the Pacific Northwest weather holds out, we’re heading to the river to do some fishing. What are your weekend plans?!

Ciao!

32/52: Growing up & Southwestern Stuffed Bell Peppers

Growing up is funny. When you’re a child all you can think about is: when I’m this age, I’ll do this… adults have it soo easy… being an adult is so much better than being a kid… etc. Looking back on my childhood and teen years, it seems like we were always in such a hurry to grow up. I recently went through quite a bit of stuff I had in storage at my dad’s place. It was like a blast from the past. It brought back all of those feelings of childhood where you just felt like the world/your parents were so unfair at times and like you never got to do what you want. Childhood is funny like that. Because now I look back and think, “What in the world was I thinking?!” I had it made! Haha. These memories made me wonder if my future kids will feel the same way I did. I bet they will. Funny stuff.

Also when I was going through the pictures I realized that my love of food went back to my very first years. Quite a few of the pictures of me when I was young were either taken in the kitchen, or with me playing in my toy kitchen in my room. I remember that I loved being in the kitchen with my mom while she was making dinner or cookies, pretty much anything.

I was even excited to help with dishes! 🙂

Another memory surrounding food from my childhood is absolutely hating some things my mom cooked. She generally tried to cook things my dad liked and that meant certain things that totally grossed me out. There were times I think I stayed at the dinner table until it was my bed time, and went straight to bed because I didn’t eat my dinner. One of those dishes was stuffed peppers. Oh my goodness I would nearly cry whenever I saw my mom cooking them up for dinner. But alas, I have grown up and I’m not so picky anymore. In fact, one of my favorite dishes {Inspired by my hubby} now is stuffed peppers! But, not your typical stuffed peppers… they have a {of course} southwestern/mexican twist! Yum! This is my second time making these and this time I added in some ground turkey. But these are easily made vegetarian by excluding that, in fact that is what the original recipe calls for.

I’m honestly not sure why I despised stuffed peppers so much before. Probably just because they look weird. I don’t know if I even really tasted them. This recipe I make is so good. The inside is like mexican comfort food and the peppers are tender yet still slightly crisp… delicious! And, not to mention filling! I think I only ate half of my pepper before I gave the rest to Johnny. These should definitely be on your ‘to make’ list! Funny how your taste buds grow up too! I am thankful I now love stuffed peppers because these are now one of my favorite dinners!

Southwest Stuffed Bell Peppers

Ingredients:

4 very large or 6 medium sweet peppers {red, yellow, or orange}
1 Tbs salt
1/2 C white rice
2 Tbs olive oil
1 onion, diced
3 garlic cloves, minced
1/2 – 1 jalapeno, minced {I included seeds for extra heat}
1 14oz can black beans, drained and rinsed {1 cup if you are using meat}
1/2 lb ground turkey, cooked
1 cup frozen corn kernels
2 green onions, sliced
1/2-1 tsp chili powder {you can start with 1/2 and add more to taste}
1/8 tsp cayenne pepper
1 tsp kosher salt, plus more to taste
1/4 black pepper, plus more to taste
1 14.5 ounce can diced tomatoes, preferably fire roasted {drained}
1 1/4 C jack or pepperjack cheese, divided
3-4 Tbs chopped fresh cilantro
tortilla chips, just a handful and more for serving if desired.

Directions:

1. Preheat oven to 350.  Prepare peppers by washing, slicing tops off, and removing insides.  Bring 4 quarts of water to a boil and add 1 tablespoon salt.   Boil whole peppers for about 3-4 minutes, until they begin to soften.  Remove from water with tongs and place on paper towels to drain.

2. If you are adding turkey to this meal – make sure to cook it and lightly season it with pepper and salt. Then remove from pan and set aside until step 4.

3. Add rice to boiling water and cook until tender, about 13 minutes.  Drain thoroughly. {I pre-cooked my rice in a rice cooker}

4. Heat oil in a 12-inch skillet over medium-high heat.  Add onions, garlic, and jalapeno and cook until softened, about 5 minutes.  Add corn, beans, turkey, green onions, chili powder, kosher salt, and pepper. Stir until corn and beans are heated through, about 5 minutes.  Place peppers in a baking dish.  Remove skillet from heat and add rice, tomatoes, 1 cup cheese, and cilantro.  Stir to combine well and give it a taste.  Add additional salt, pepper, and chili powder to your liking.  Then evenly divide mixture between peppers.

5. Top peppers with remaining 1/4 cup cheese (or more if you can fit it on there 🙂 and crushed tortilla chips.

6. Bake at 350 for about 30 minutes.

Source & Recipe: Slightly adapted from Our Best Bites <– Full tutorial here!

30/52: Chicken Tortilla Soup

What a beautiful weekend we had, right!? I loved seeing the sunshine, it was a welcomed change from the dreary, autumn like weather we’ve been having. And let me just tell you the reason I’m posting late {again… I know, I know}… it was because I was livin’ it up in the bee-u-tee-ful weather. Well, that’s what I wish I could tell you. Truth be told, I was livin’ it up… On my couch.   :-/ For those who know me I have had a horrible stint of bring sick with one thing or another since May. I thought I had finally gotten better, but my lovely allergies led me to a horrible sinus infection which led to a bigger infection in my lungs and it totally knocked me down ALL weekend. Sigh. Thank goodness for my loving and kind Hubby who kicked it on the couch with me all weekend. We have almost finished Pacific and we just bought it yesterday {for those who don’t know it is total of nearly 10 hours about the war in the Pacific}. Watch it people! Good stuff! I also managed to pop out some yummy goodies for us for my July Baking project with my Aunt, but due to my being sick and other circumstances that project will be posted later this week. And believe you me… It’s a goooood post, so stay tuned.

Long story short, due to my recovery, my post is a little late. Thank goodness for antibiotics. I’m going on nearly 2 weeks and didn’t show signs of getting better. Sigh! Anyway… In honor of my recovery I’m posting my recipe for my favorite soup! While chicken noodle is great, I rarely crave it. My soup of choice is Chicken Tortilla Soup! Delish. 🙂 It is so simple, next time you’re in the mood for soup or you’re sicky, give it a try. It will make you feel better – I’m certain of it. {And pardon the pictures… they were taken with my iPhone… I so didn’t have the energy to grab my Rebel, edit, etc. tonight!}

So yummy…This is definitely my ‘comfort’ soup!

Chicken Tortilla Soup

Ingredients:

2 chicken breasts
1/2 an onion, chopped
2 cloves garlic, minced
1 cup shredded carrots
1 cup black beans
1 cup salsa {I prefer Pace w/ this — you could use fresh salsa but you will get better flavor from Pace}
4 cups chicken broth
1 cup canned corn
Johnnys seasoning salt
Onion powder
Garlic powder
Red pepper flakes {optional}

Directions:

1. Add oil to a large skillet and preheat pan on medium heat. Season chicken with Johnnys, onion powder, garlic powder and red pepper flakes {I cut my chicken into tender size pieces, they were nice and easy to work with}. Add chicken to skillet and cook until just done. Remove from skillet and set aside for them to cool. Once cooled, shred or cut chicken into bite size pieces.

2. Add oil to large pot {about 1 T} and heat on medium. Add onion and garlic, saute until transparent. Add carrots, saute a few moments longer. Once tender, add in the black beans and chicken and stir to combine, then add salsa and give a final stir. Once combined, add chicken broth and bring soup to a boil. Reduce heat and let simmer for approximately 20 minutes.

3.  After first simmer, add corn and bring back to a boil. Reduce heat and let simmer until ready to serve! Serve with tortilla chips, shredded cheese, sour cream, avocado, etc…

Source & Recipe: Santies Sunnyside Up … adapted from my mom’s recipe.

I hope everyone has a fantastic week! Keep checking back for my next awesome, yummy post… I am so excited to share it with you all!

29/52: Phyllo Wrapped Huevos Rancheros

Hmm… it seems to be my routine to post my weekly blog post late! Oops! Last week’s entry is late with good reason though. I decided to ‘unplug’ and relax with my husband since he will be working quite a bit of overtime starting this week. I will likely only see him in the morning for a little bit {about 30 minutes when getting him ready to get out the door}, and for a few hours before we go to bed at night. He will be putting in 12 hour days + commute time. Eek.

I had originally planned to post about a super easy chili recipe I made last week, but maybe I’ll save that one for later because I think this recipe is fabulous! I had the Food Network on the other morning {imagine that!} and my hubby saw this recipe, and made sure the ingredients made it on my grocery list. As soon as he said it had black beans in it, I was down! Anything involving black beans is priority on my list — yum! He described the recipe and then I googled it to make sure I wasn’t missing anything… I was thrilled at the fun spin this had on breakfast.

If you guys haven’t watched Big Daddy’s House on Food Network, be sure to do so. He always has super fun and easy recipes that are a spin on traditional recipes – or something entirely new! This one is… Phyllo Wrapped Huevos Rancheros!

Yum! It was super easy and fun — we made it together so that made it even more fun — and delicious too! Due to time issues, we just substituted his ranchero sauce for salsa. If you want to try the sauce too {which we will do next time} check out the link after the recipe.

Phyllo Wrapped Huevos Rancheros

Ingredients:

2 T butter
8 eggs, lightly scrambled
6 sheets phyllo dough
Bread crumbs
1/4 – 1/2 C melted butter
1/2 can black beans, drained and rinsed
1 C crumbled queso fresco

Directions:

Preheat the oven to 450 degrees F.

Add 2 tablespoons of butter to a large skillet over medium heat. Add the eggs and stir with a rubber spatula until halfway cooked. Remove from the heat. Cook’s Note: Eggs will cook more later in the oven.

Lay the phyllo dough out on a parchment lined sheet pan and cover with a slightly damp towel.

Sprinkle a large cutting board lightly with bread crumbs (this will help prevent phyllo from sticking and also give it an extra crunch in the finished product). Take 1 sheet of phyllo and lay it out on the board. Brush the phyllo sheet with melted butter. Put another piece on top and brush with butter. Repeat with remaining phyllo sheets.

Working lengthwise, spread eggs onto the phyllo leaving 2-inches on each edge. Top with 1/2 can of black beans and 1 cup of crumbled queso fresco. Roll the phyllo into a pinwheel and glue the final edge with melted butter. Brush the entire log with melted butter. Put on a parchment lined quarter sheet pan and bake until nicely browned, about 10 to 12 minutes. Remove from the oven and allow to cool slightly.

*My note: Serve with sour cream, salsa and smashed avocado {or guacamole}*

Source & Recipe: Big Daddy’s House

Have an awesome week everyone!! 🙂

28/52: Braised Carnitas Tacos

Man, I think my brain needs a break. I have this tendency to get completely engrossed in a topic that is bothering me, to the point where I physically get upset {stomach hurts, lose appetite, etc}. And that was my problem last night. We are currently taking a course about child abuse and neglect, and what you need to report, how to report, etc. It is completely beyond me how someone could do such horrible things to their child. I of course want to be an advocate for children and help them get help when they need it. But I just don’t want to have to experience a situation where I need to report. I’m not sure if that makes any sense… But, I guess this is all a part of being a teacher. I knew I would have to deal with this, but it is one of those situations that until the reality of it hits you it’s hard to conceptualize. Sigh. At least the course is almost over so I won’t have to be thinking about things in extreme detail for a bit.

Anyway… on to something more uplifting. I am taking a break from it all and bringing some delicious food straight to you! Voila! 🙂

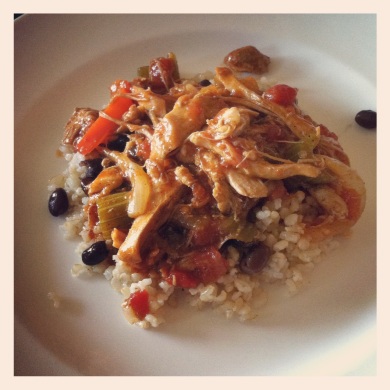
I was sitting here yesterday trying to figure out what I am going to post this week – {Since I have been pre-occupied with school and not cooking or baking much of anything that is blog worthy} – when it hit me. Gasp. I realized I never shared with you my delicious recipe for slow cooked, braised carnitas!! Slow cooked pork shoulder in a flavorful sauce, wrapped up in a warm tortilla with cilantro lime rice, black beans and homemade salsa?! Oh yes.

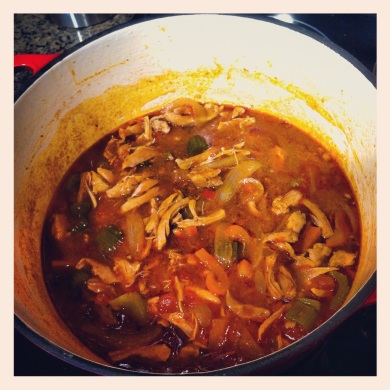
Until recently I had never had braised carnitas but once I did it was life changing! The cliff’s note version of the story is… One afternoon the hubby and I decided to pop down to The Matador and grab some lunch, we both settled on the braised carnitas and were instantly in Mexican food heaven {which for me, Mexican food is heaven, I could eat it everyday!}. The meat just melted in your mouth and was popping with insane flavor. After that, I decided it was time to track down a similar recipe and introduce this into our menu… after much searching I found a recipe that had similar spices, but I wasn’t crazy about the overall recipe. So I found yet another, added a few spices to that one and a more flavorful beer and was totally pleased.

I always know when I have a good recipe because Johnny walks in the door from work and tells me how good dinner smells… that’s the true test for a winning recipe! My one regret — the recipe smelled so good, and I was so anxious to try it that I only got a few pics. It didn’t do justice… you simply just have to try this recipe!

Oh yeah. The meat just falls apart once its done, so good. Serve it up with a warmed tortilla, cilantro-lime rice {cook up rice, add juice of 1 lime, and a bunch of chopped cilantro, stir and you’re in business}, black beans, avocado… basically the works}. This is one of those meals that just warms your soul, it is mucho delicioso!

Braised Carnitas Tacos

Ingredients:
5 lbs boneless pork shoulder, cut into 5 inch chunks, trimmed of excess fat
2 T sea salt
2 T vegetable oil
1 cup white onion, diced
1-2 T fresh garlic minced
2 bottles {12 oz.} Rogue Amber Ale **This is my substitution, the recipe originally called for Fat Tire, but I love Rogue’s Amber – you could use anything you like
1 tsp chile powder
1/4 tsp paprika
1/4 tsp cayenne pepper powder
1/2 tsp ground cumin
1/8 tsp cinnamon
1/8 tsp thyme
1/8 tsp black pepper
2 whole bay leaves
Tortillas
Garnish — lime wedges and salsa

Directions:
Using paper towels, dry off the pork and generously season with salt.

Heat the oil in a large Dutch oven over medium-high heat. Cook the pieces of pork in a single layer until very well-browned, turning them as little as possible so they get nice and dark before flipping them around. If your cooking vessel is too small to cook them in a single-layer, cook them in two batches. Be sure to take your time to get a deep brown color as it enhances the flavor. It usually takes me about 30 minutes to properly brown all the meat.

Once all the pork is browned, remove them from the pot and blot away any excess fat with a paper towel. Discard all but one tablespoon of the grease that remains in the pot. Lower the heat to medium. Add the onions to the pot and cook until translucent. Add the garlic and cook for an additional one to two minutes. Then pour in the beer, scraping the bottom of the pot with a wooden spoon to release all the brown bits.

Heat the oven to 350ºF.

Add the pork back to the pot and add the remaining of the seasonings and spices. Braise in the oven uncovered for 3 to 3½ hours, turning the pork a few times during cooking, until much of the liquid is evaporated and the pork is falling apart. Remove the pan from the oven and lift the pork pieces out of the liquid and set them on a platter.

Once the pork pieces are cool enough to handle, shred them into bite-sized pieces, discarding any big chunks of fat. Return the pork pieces back to the roasting pan and cook in the oven, turning occasionally, until the liquid has evaporated and the pork is crispy and caramelized.

Serve with tortillas and your choice of salsas and toppings.

Source & Recipe: Slightly adapted from Tasty Kitchen